Wednesday, April 9, 2014


Hey all I know it has been a very long time since I posted here. lets just say life has been complicated for a while with family illnesses. Life has been slowly returning to normal.
So let me bring you up to date on a few things.

I am happy to announce that our rubber stamp line has a new name and look. We have launched it as its own division!

You can now find all our great stamps at www.emagineart.com
You will find new designs from myself and a few of my artist friends. The amazing Craig B. Worrell and the wonderful Angela Oster.

We have also added a how to page. There a several downloadable pdf files form some of my classes and posts. We will be adding more of those and videos as well.

Think Spring!

Friday, June 3, 2011

If you are into journaling or altered books and have ever wanted a age paper look here is a trick to try.

Giving paper a aged look can be tricky. Why, because aged paper has a subtle yet very specific yellowish color. Manly this is caused by time, oxidation. If you try and use the usual paints and dies the color will often come out to yellow, to brown or just to intense to look real.

So what do you do? Well there is one substance that I know of that stains paper just right to make it look believably time worn. It is a exotic substance made from a small bean that has been carefully cultivated and is prized by people around the world, especially those that have a hard time waking up in the morning!

Coffee, ya your morning Joe.
As we all know coffee stains as well as it perks us up, so why don't we put it those staining powers to work for us.

There are two ways I recommend to use coffee to "age" paper. One means you get to have your coffee and craft with it too. The other...not so much.

The first and easiest way to age your papers with coffee is to brew a fresh pot and then take the grounds and sprinkle/ spread/ dump them all over your nice paper. And then don't touch it. Really just leave it there. Really...HEY! I said don't touch it. He he.

Okay once it is dry you can brush off all the grounds. You will be left with a piece of paper the has a aged and parchment look to it.

The second method is my little twist on using coffee as a dye. What if you want a even aged look to your paper or maybe just around the edges or in a certain area. Or you just don't want the time and mess involved with the grounds. Here is what you can do.

Fill a paper coffee filter with about half a cup of ground coffee. Fold the sides up so that it looks like a little bag and wrap it closed with a rubber band.

Next take your little bag of coffee and soak it in a cup to two cups of 90% rubbing alcohol. Just watch. The alcohol is making a coffee extraction. Cool huh! Let the coffee steep in the alcohol until it is nice and dark ( maybe a half an hour or so ). Now you can poor it into a spray bottle and you have a control able, store able, portable, coffee scented, aging dye for your papers.

Just spritz it on to your papers and let dry, or use your heat gun to dry it. You will love the effect and the easy control the spray bottle gives you.

And don't worry about it going bad, because it is a alcohol extracted dye it will have a long shelf life.

Who said aging wasn't fun!

Pics will be added soon.

Thursday, February 24, 2011

Goofy Discovery Tip!

So I was sitting at my drafting table the other day dilegently doodling on my calendar when a stray copic marker came rolling down from the pile of work related items at the top of the table. It came to rest against one of my favorite multi tasking tools. Yep the good old toothbrush. Sooooo, I had to try it. If you take a fairly fresh Copic, one with a good amount of ink in it and start pulling it towards you ( you want to pull it towards you so the things fly away from you ) across the end of the toothbrush bristles it will make a very nice, fine and relativley even ( depending on the condition of the toothbrush ) spray of ink!

Give it a try.

Wednesday, January 26, 2011

Copic Marker tip

Ever wonder how to get really smooth blends with your Copic markers?
There's a trick. Do you wanna know what it is? Ok, but you can tell anybody. (looking around to see if anyone is listening ). Its call tip to tip blending. Really it is. I don't make this stuff up, well some of it but not this.

Here's what you do pick two colors you would like to blend to have blend together an fade into one another.
Start with some thing simple like blue and yellow or red and yellow. Take the tip of your yellow maker and rub it across the red or blue one. (Be sure to take the caps off it works better. Do ask me how I know that.)
Ok now look at the end of the yellow makers tip. There is some red or blue on there right.? Ok now start coloring with that part of the maker. A you color the color you "lifted" for the other maker will gradually run out creating a soft even blend. Pretty cool! You can repeat this process over and over to build up the color as you want or apply it over another area you have already colored.

Try it with a Colorless Blender and see what happens!

Try using this trick to blend colors together to make highlights and add depth to your creations.


Saturday, January 22, 2011

Wondering where I have been?

So where have I been? Well, between trying to get the new studio open, being sick off and on with a cold that just wouldn't go away and a car accident, and teaching a bunch of classes last this past week I have been kinda busy.  But I think I might find time in today or tomorrow to post a quick tip. So keep looking! Because I am back and ready to play, err I mean work!

Wednesday, December 29, 2010

Tips fo Prisma color Pencils

If you have a set of Prisma colored pencils you probably know how fantastic they are for coloring and what a wide variety of colors they come in. And you might even know that you can use a product called Gamsol ( mineral spirits ) to dissolve them and create some interesting effects but did you know that there is a much safer and much more economical alternative to Gamsol?

Today I am going to show you how to use your colored pencils with a product you probably already have in your home. And it probably only cost you a dollar or two for 16oz. What is this mystery product? Drum roll please .... Plan old Rubbing Alcohol. Yep, Alcohol. It dissolves the wax in your pencils without damaging them or leaving any residue. It also drys quickly and allows you to work back over your drawing or stamped image quickly.

You might be thinking " Okay, Eric, that's great and all but what can I do with it and how am I supposed to do it?"

My answer, "Good Question." Your reply "Thanks".

Let me show you.

Because you can use alcohol to dissolve the vehicle ( the wax ) that carries the pigment ( the colored bits ) in your pencils this opens up a wide variety of tools you can now use with your colored pencils and a huge range of possibilities. For his demonstration I will stick to a few basic tools. Ones that you will see me use often in future demonstrations.

Here are a few of the tools that you might already have floating around and the ones I will be using.

They are a round #5 paint brush for acrylics, Two different brands of colorless alcohol marker blenders (one of their names starts with a "C" and ends in "opic", a Adirondack's alcohol ink fillable pen ( very handy ), a Refill bottle for a colorless blender from a maker company that starts with that letter C, and last but not least a well used toothbrush.

First chose the image you want to work with and stamp, draw or print off two. Pick the one you want to make a mask from and cut it out. Remember the better the job you do cutting out your mask the better your results will be.

Using either your refill bottle of colorless blender ink, ie alcohol. Or a small container filled with Rubbing Alcohol. Dip the end of your old toothbrush into the alcohol. Here is the important part. You don't need a lot. Just enough to wet the bristles should be enough.

Now on a scrap piece of paper start rubbing the sharpened end of you pencil across the end of the toothbrush. Going away from you is best if you don't want to wear whatever color your using. Try changing the angle and distance away from the paper that you hold the toothbrush to see different effects. Once you're comfortable with how it works place the mask over your image and applying the color to it using toothbrush. The results should look something like this.


Next you can use your paintbrush dipped in alcohol to paint with. There are two ways to do this. One is to color in an area with your pencils and then wash over it with the wet brush. The other is to rub the wet brush over the sharpened end of your pencil loading the brush with color. Both techniques work great and I used both in the next pictures. If you look closely you can see the brush strokes created by the washes and daubs of color created by loading the brush with color from the pencil.


Remember at any point once the alcohol has dried you can go back and color over it with your pencils. This is what I did with the tan color in the picture above.

In the next series of pictures I will use my pencils to color in different areas on the car, boy and dog using one or the other of the blending markers to blend the colors together and to fade them out to white. I will also work back over these areas with the pencils building up different layers of color to create more depth.

In this picture I started with a ochre base color for the whole box.Then I applied red to the edges and corners. Using a blending marker I mixed the two colors together.
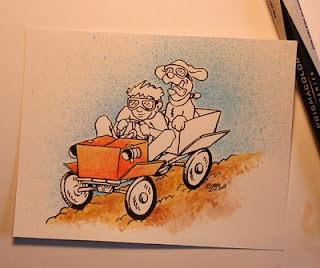

Here I added some more red with the pencils and blended it together using the brush tip of the Copic blender ( ha! I bet you thought I wasn't going to say it did you! ha! ) The Copic's brush tip gives you a looser blend. 


Here using grey and one of the blenders with a firmer tip I have colored in the wheels and goggles while adding some shadow to the boxes. The blenders with the firmer tips seem to work best for fading colors to white.


And finally using the various techniques above is the finished image.

I hope you enjoyed this demo and found it useful. If you have any questions drop me a email.
Thanks
-Eric